Showing posts with label decorating. Show all posts

Wednesday, February 8, 2012

Tutorial: Pattern Paper Heart Garland


I am having fun making some Valentine's decorations on the cheap this year. On Monday, I showed you my Valentine's Day tree branch decor, using simple branches, a vase, and coffee beans. Today, I am going to show you a heart garland made from pattern paper.

This idea formed because it seems that everyone has some sort of project with book pages. When I was at Anthropologie last spring, they were using cut up sewing pattern pieces in the shapes of butterflies to decorate. I decided to try and combine the two ideas and make a garland, with cut-out hearts, using sewing pattern paper.

This is what I came up with:
I am really happy with how it turned out!


I decided to make all of my hearts the same size (varying sizes could look really cool too). So, I made a stencil and accordion-folded my old pattern pieces (I got this pattern in the free bin at my local thrift store). I traced on the hearts.


Then, I cut, cut, cut until I had a huge pile of hearts.


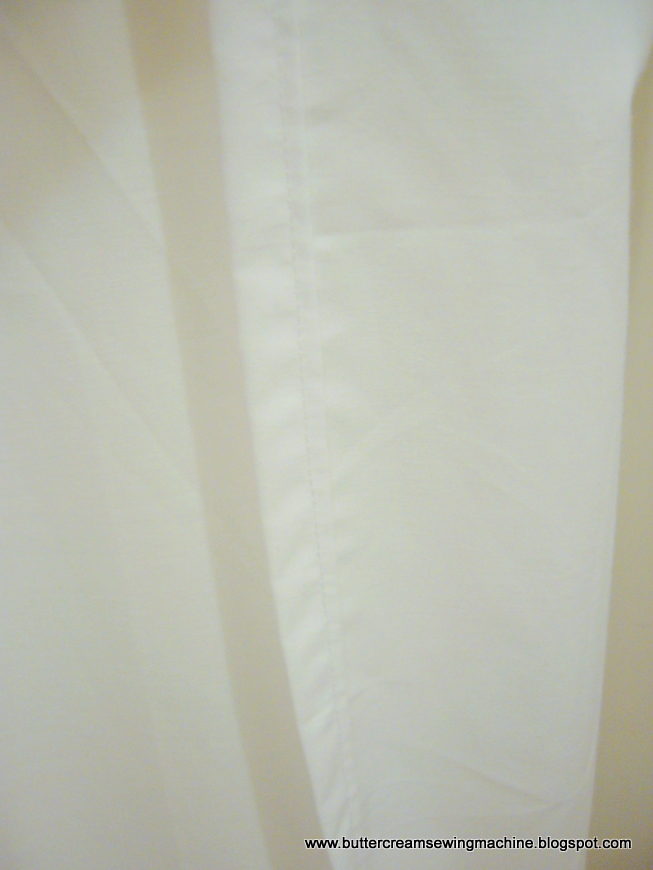
I layered 4 open hearts in my sewing machine and sewed a straight line going down the middle. I left about 3 inches gap between each heart, just by continuing to sew even though I didn't have anything I was feeding into the machine. It helped to hold onto the heart I had just sewn for a few extra inches after it was sewn through, and then feeding the next set of hearts through.
All of my hearts were on one continuous string of thread. If the thread broke, I just went back to the last heart that was connected and continued from there.
I love how some of the hearts have little sewing lines or little scissors! So fun!

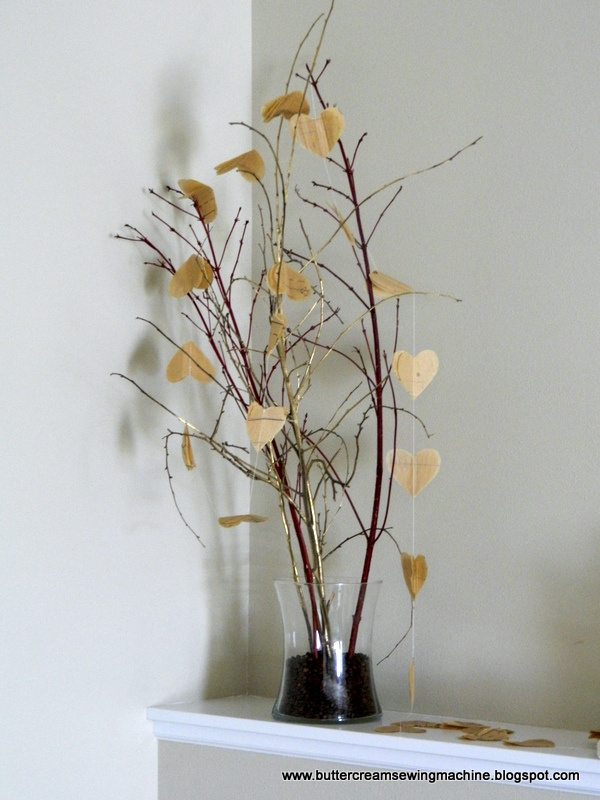
After I had a long, long string of hearts, I began to drape them over my Valentine's tree branch decor. You could really string these anywhere!

I hope this inspires you to make some quick Valentine's decor with something you have on hand! What are your favorite Valentine's decorations around your home?

Other Valentine's Day posts:
Pin It

Monday, February 6, 2012

Tutorial: Quick V-Day Tree Branch Decor


So, if you haven't noticed on my blog already, most of my projects use items that I already have around and don't involve purchasing a lot of extra supplies. I also focus a lot of time on sewing/craft projects and baking. However, I do like to mix it up and do a little bit of decor every once in awhile.

You may remember (or may not) my cheap Christmas branch decor project that I posted in December. Using a vase from the same garage sale ($2), some tree branches from the neighborhood, a little gold spray paint, and some coffee beans I made some Valentine's Day decor that is perfect for a mantel (or in my case, a shelf).


This project is pretty simple. I used two types of branches. One type is a dogwood (I believe), where the branches are already red. The other type is just any old regular brown branch. The brown branches were spraypainted gold.


Next, the branches were stuck into a green foam thing inside of the vase. Some branches were trimmed to fit in the vase better.


Finally, coffee beans were pored around and on top of the green foam (making sure to cover it all).


Now you have some fresh smelling, quick Valentine's Day decor to place on your mantel!


Come back on Wednesday, because I am going to be showing you
a fun garland I made for Valentine's Day!


Other Valentine's Day posts:
Pin It

Tuesday, August 16, 2011

Bed Sheet to Shower Curtain


I am not one who loves a lot of color. I grew up in a house where all of the walls in the whole house remained white until I was in high school - when I got up the nerve to paint one of my walls a light blue. ha.

Last month, a friend visited and commented on how she doesn't think there could be a more boring bathroom. Since then, we have moved to a new apartment where we have not one but two bathrooms! I knew I needed to get a shower curtain and a little decor for in there. I ventured out and chose an unexpected color combination of a burnt red-orange and an antique purple-gray.


I searched far and wide for a shower curtain that would compliment the colors I chose, and I settled on the idea of having an elegant white shower curtain with some sort of texture or white design in it.

But, $30 for something that is plain white? No way! I decided to make my own. With a few supplies I was able to make a fabric shower curtain that matched my colors perfectly. I used this post as a starting point for the construction, but took a different direction and did my own thing.

First, I matched my towels to paint swatches that I can carry with me anywhere - which was helpful when going to the fabric store. Next, I bought a coordinating print in each towel color from a fabric store (for my design I needed less than a 1/4 yard of each of the two colors) and a plain white flat sheet ($9 for a full size at Wal-Mart).


Next, I got the bed sheet ready. I wanted the top cuff of the bed sheet to be at the top of the shower curtain (if you look store bought shower curtains, they almost all have a cuff at the top). With the cuff at the top, the shower curtain is too wide, so I cut off enough inches to make it 70" W plus an additional 1" seam allowance.

I then hemmed the side, by folding over 1/2" of an inch and ironing. Then, I folding it over another 1/2" of an inch. Finally, I sewed down the side of the curtain using coordinating thread. The reason I had such a big seam allowance is because I wanted my sides to match each other (and that's how the other side was finished).

Then, I decided how much fabric I wanted going across the middle of the shower curtain. I chose to have one purple and one orange strip (each with a finished width of 1.5" - totaling 3").

Knowing this, I calculated how much fabric was extra in the length of the curtain. My desired length was 72", 3" of that is purple/orange fabric. So that leaves 69" of white fabric.


I measured 9" down from the top cuff (because that is where I wanted my orange/purple fabrics to be), and I cut across the width of the sheet. Now, you have 2 pieces of white fabric, one connected to the top cuff and one bottom piece. I cut out my excess white fabric from the bottom piece on the unfinished side (so I didn't have to do any more hems).

Before I connected the whole shower curtain together, I sewed buttonholes at the top for my shower rings (so I didn't have a lot of extra fabric to wrestle with). I made 12 buttonholes, each 6" apart and about 5/8" of an inch high. I got these measurements based on my shower curtain liner (I wanted the two to line up).

Next, I sewed on my orange and purple fabrics. I had cut 2 orange strips, each 2" wide by 40", and 2 purple strips, each 2" wide by 40". I connected my strips, and sewed them on to the top cuff of the shower curtain. I then attached the bottom part of the shower curtain to the orange/purple strips. I made sure my edges on the colored strips were hemmed to match the rest of the shower curtain.


And, now I have a perfectly matching shower curtain - for only about $15 and totally personalized for what I wanted!

I hope this inspires you to make something unique! I think it could be fun to use a vintage sheet. Or, you could even simplify this to be one sheet with no extra fabric added to it by just hemming the side and bottom of the sheet and adding some buttonholes. The possibilities are endless!

Let me know what you made!
K

Join  us Saturdays at tatertotsandjello.com for the weekend wrap 
 up           party!


Pin It