Showing posts with label baking. Show all posts

Wednesday, March 21, 2012

Preparing for Baby: Freezer Meals

During the first few months of pregnancy, I started trying out some freezer meals. I thought that it would be great to have some meals ready to go in the freezer for when the baby is born. So, I started doubling recipes that we already enjoyed and freezing half of it. However, I really didn't have the knowledge of how to freeze things correctly, so I wasn't really happy with the results when we defrosted the meals to test them out. Next, I found some simple recipes that could be frozen, but most were 3 ingredients or less (which isn't always bad), but a lot of the recipes ended up very bland.

My freezer stocked and full with freezer meals made from Once a Month Mom recipes!
So, I took a break from the whole freezer meal thing - until I found this website a couple of weeks ago. One a Month Mom is a website devoted to freezer meals. There are six menus to choose from, and each menu is designed to give you about a month's worth of meals. The idea is that you go shopping, spend one loooong day cooking (10-12 hours), freeze all your meals, and then pull them out daily as needed.

I did a lot of exploring on the website, and I was hooked and knew this is what I wanted to try. One a Month Mom had great information about how to freeze things properly and how to prepare for a day of cooking.

I chose to try the traditional menu for February. Not only do they give you all of the recipes, but they give you instructions on an order for cooking all of the meals that makes sense, a grocery list, printable labels for all of your freezer items, and the ability to choose how many people in your family are going to be eating the meals (which automatically adjusts the amount of items on your grocery list and the recipes). I am in love!

Taco Pasta, cooked, frozen, and labeled.
Here is a rundown of what I made (most items were split into 2 meals):
Chile Verde
Mini Ham and Egg Cups
Coffee Cake Muffins
Mini Shepherd's Pies
Pizzadillas
Bagel Pizzas
Stirfry Veggie and Rice Packets
Mexican Chicken
Chicken and Broccoli Bake
Easy Ranch Chicken
Chicken Parmesan Bake
Taco Pasta
Beef Enchiladas
Beef Vegetable Soup

All the veggies prepped and ready to go.
Instead of doing one day of cooking, I spread out the recipes over a week. I did all of the shopping on Monday. On Tuesday, I prepped the vegetables and meat. Wednesday-Friday were devoted to about 3-5 hours of cooking each day.

Coffee Cake Muffins
I now have a freezer stocked with 23 large meals (each will have at least a lunch or two worth of leftovers). I chose not to make one of the breakfast meals (instant oatmeal packages) because we make instant oatmeal all of the time, and I didn't think the packets would really save us that much time.

Easy Ranch Chicken - labeled with directions and the date (printable from the website).
Although at this time I can't give you a rundown on the taste of each of the meals (eating them all before the baby is born does kind of defeat the purpose), I plan on posting a follow-up with some of our favorite meals and what did/didn't work for me.
Have you tried freezing meals before?
Were you successful?

*I am in no way compensated by this post (Once a Month Mom doesn't know I exist :) ), just thought I would share a good find!


Pin It

Friday, February 17, 2012

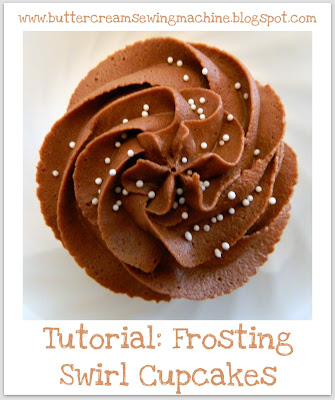
Friday Night Treat/Tutorial: Frosting Swirl Cupcakes

Tonight's Friday Night Treat is focused on this frosting recipe. I am going to show you how to use it in a fun way!


I am actually not a huge fan of cake (I know, I don't love cake or chocolate)...but when cake is in the form of a cupcake, it is totally different. I can't really explain why, but I think it has to do with the ratio of cake to frosting, the fun cupcake liners, and the circle shape that are just so much more appetizing than a square slice of cake. And, you don't have to use utensils or plates. That is genius all by itself.

I love to look around at cupcakes (I have a Pinterest board devoted mostly to cupcakes - although a few cakes have snuck their way in). You can get very complex and spend hours decorating a set of cupcakes, or you can go a simple route. Today, I want to show you a simple cupcake design that anyone can make. It looks great, and it is so fast!

I just made a simple chocolate cupcake (from a box mix) paired with my frosting recipe. In order to make a chocolate buttercream frosting, I melted 3 squares of unsweetened baking chocolate and mixed that in towards the end of the mixing time.

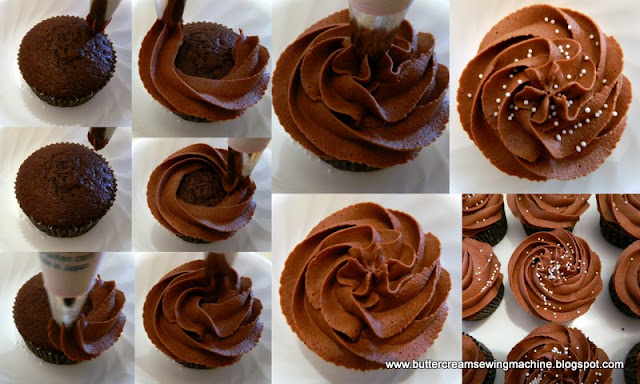
The frosting swirl cupcake uses a large tip - Wilton 1M. You can find Wilton tips for sale in sets at places like Wal-Mart, or sold individually at Michael's or Hobby Lobby. A large tip like this will cost around $2. Place your tip in a decorating bag (or a Ziploc bag with the corner cut out), and load it about 2/3 full of frosting, twisting the top closed. I like to squeeze the bag and make sure the frosting is coming out nice and even before I get near a cupcake.

Placing my decorating tip close to the cupcake, but not touching it, I start on one edge and swirl my way around. When I get to the point I started, I continue with the same string of frosting making an inside row. I like to finish in the center of the cupcake, squeezing out a star shape. To do this, you make sure your bag is completely vertical. Squeeze a little frosting, stop squeezing, and lift up your tip. For these cupcakes, I chose to use a white pearl sprinkle. Another one of my favorite sprinkles lately is a large sugar granule. It gives the cupcake a nice sparkle.

The great thing about decorating cupcakes (or cake in general) is that if you make a mistake, you can just scrape off the frosting (trying not to scrape any cake crumbs), and try again. You also can make the cupcakes any color to match whatever party you are throwing (or whatever color you love). I commonly make at least some basic frosting swirl cupcakes when I am baking for a baby shower. They go great with a color theme, and it allows 'fancy' (also known as time-consuming) cupcakes to be showcased.

Here is a picture of a baby shower I baked for where 1/2 of the cupcakes were a swirl design:
All of the blue and purple cupcakes in this case were swirled.
The pink and the yellow cupcakes were a large flower design (which I will be showing you soon).

I hope this helps you!

Now for the important questions:
Is there anyone else who loves a good cupcake but doesn't love a slice of cake?
Is it only me?


Pin It

Friday, January 27, 2012

Friday Night Treat: Cream Puffs


I don't know about you, but sometimes I feel like I am short on time - all the time. That's how I have been feeling this week. We bought a house (or I should say that we live in a house that we have a loan on) last week and moved in over the weekend. We have been cleaning, unpacking, and the new found home ownership responsibility - shoveling snow. And then, we got invited to two dinner parties within a week. Maybe I should have said "no", but instead I said, "What can I bring?" I needed something fast, delicious, and I am always looking for something inexpensive. So, I decided to make cream puffs.

Cream puffs were always my mom's go-to dessert when we had guests over. You can prepare them in advance, they are simple, they look super fancy, and they are cheap. Win-win-win-win. So, I would love to share this delicious recipe with you now!

Cream Puffs

1 C water
1/2 C butter or margarine
1 C all-purpose flour
4 eggs
Pudding or whipped cream (for filling)

Preheat oven to 400 degrees. 


Bring water and butter to a rolling boil.


Stir in flour. Stir vigorously over low heat about 1 minute or until mixture forms a ball. Remove from heat.


Beat in eggs, all at one time; continue beating until smooth (you can use a hand mixer if you would like).


Drop dough by a scant 1/4 cup, 3 inches apart onto an ungreased baking sheet*.


Bake 35 to 40 minutes or until puffed and golden. Cool away from draft. Cut off tops (I like to use a bread knife for this). Pull out any filaments of soft dough.


Carefully fill puffs with pudding or whipped cream. Replace tops. Refrigerate until serving time**.


Yield: 12 cream puffs

*Sometimes my grandma will make a mini-cream puff size - closer to an 1/8 cup each.
**For the dinner party we were attending, I cut the cream puffs in half and brought them in a container unfilled. I then brought chocolate pudding and whipped cream on the side, so the guests could fill their cream puff any way they wanted to.

I love simple recipes! Now, back to the cleaning...and unpacking...
And, I hope you stop by next week because I have some fun Valentine crafts and snacks that I am sooo excited to share with you! See you then!

Have a great weekend!

Blogs I link to: CraftOManiac, Brassy Apple, Sumo’s Sweet Stuff, Tip Junkie, Shwin and Shwin, Home Stories A to Z, Creative Itch, Sugar Bee Crafts, Coastal Charm, Not Just a Housewife, Hope Studios, Chef in Training, Mommy By Day Crafter By Night, Southern Lovely, Passionately Artistic, Sew Woodsy, Savvy Southern Style, Ginger Snaps, Someday Crafts, Creations by Kara, Rae Gun Ramblings, Delightful Order, House of Hepworths, The CSI Project, Remodelaholic, Tatertots & Jello, Shabby Nest, Chic on a Shoestring, Simple Home Life, 30 Handmade Days, Family Ever After, Craftionary, I Heart Nap Time, Positively Splendid, Nifty Thrifty Things Pin It

Friday, January 20, 2012

Friday Night Treat: Frosting!


Everyone needs a good frosting recipe - and although this recipe doesn't take butter (to make it a true buttercream), it is a great frosting! I also don't have to worry about refrigerating the cake/cupcakes because of not having butter in it (does anyone else worry about that too?). The recipe is at the end of this post.

Want to see some things I've made with this frosting? I will be showing you a few of these techniques over the next couple of weeks (and I'll show you more if I have requests!).

Basic swirl on a cupcake


Large flower design on a cupcake


A combo of basic swirls and large flowers for a baby shower
(weird background - yeah, it was in our school library :) )


Ladybug cupcakes


Microphone cupcakes


Rocket ship birthday cake
(for my husband's 25th - yeah we're cool like that)


One of the first cakes I ever made
(for full disclosure)


An anniversary cake for my in-laws
(I used stiff consistency frosting to make the white roses)


Monster cupcakes - one of my all-time favorites!
I hope our little one wants a monster birthday party some day!


Are you getting some ideas of what you can make with some good frosting?
I hope so! So, here goes...

Cream together your shortening, flavoring, and water/milk.

It will look like this when it is all creamed together.


Add your powdered sugar and meringue powder. I recommend putting a towel over top of the mixer while this is happening (careful not to get it in the bowl!), so that way the powdered sugar doesn't go EVERYWHERE!

  • This will make a stiff consistency of frosting - which is best for making flowers (such as roses - like on the anniversary cake).
  • Add 1 teaspoon of water per cup of stiff consistency frosting (or 1 Tablespoon for the full recipe) to make it medium consistency - which is best for stars and borders.
  • Add 1 teaspoon of water per cup of medium consistency frosting (or 1 Tablespoon for the full recipe) to make it a thin consistency - which is best for writing and icing a cake.
Usually, I work somewhere between the thin and medium consistency. If you make it too thin, stick it in the fridge for a little while. If it is too stiff, just add a little more water until you get it to the consistency that you want. Does that make sense?

Then, you can leave it white or tint it to the color that you want. Not too bad, huh? Here's the recipe...
Buttercream Icing
(adapted from the Wilton Method of Cake Decorating)

Ingredients:
  • 1 cup of solid white vegetable shortening
  • 1 teaspoon of flavoring (vanilla, almond, or butter)
    • My note: I usually use 1/2 t vanilla, 1/2 t almond, and 1/4 t butter flavoring (if I double the recipe I don't double the flavoring).
  • 2 T milk or water
    • My note: I use water (purified to keep the frosting as white as possible) because I don't want to worry about refrigeration.
  • 1 lb. pure cane confectioners' sugar (about 4 C)
  • 1 T meringue powder
    • My note: You can find this in in the Wilton aisle at Wal-Mart
  • a pinch of salt
Directions:
  • Cream shortening, flavoring and water.
  • Add dry ingredients and mix on medium speed until all ingredients have been thoroughly mixed together.
  • Blend an additional minute or so, until creamy.
My note: I usually make a double batch whenever I make this frosting because powdered sugar comes in a 2 pound bag. I either use it all or refrigerate or freeze the leftovers for a future use!

What are you going to frost?
What do you want to learn how to do?


Pin It

Monday, January 9, 2012

Tutorial and Free Pattern: Shannon's Apron


I always loved spending time with my mom in the kitchen growing up (you can read about how we made sugar cookies here). She had a knack for throwing together a good meal, and I loved to help out! I would help mix or taste - and let's be honest, there is always enough clean up for everyone to help out with! When I think of growing up and spending time with my mom, I can imagine her kneading out bread dough and opening up her orange Betty Crocker cookbook (you know the one I'm talking about?). She is still the one I call if I have a question about a quick substitution or for a favorite recipe.

Anyway, when I was planning out Christmas gifts for this year, I knew that I wanted to do a cooking theme for my sister-in-law's family (since I, at least, associate family and food). Shannon has a toddler who loves to help out, so I found a good cookbook for toddlers and some smaller-sized kitchen utensils (like little spatulas, a whisk, and tongs). I also wanted to make an apron for the mother-daughter pair, but I really didn't want them to be too matchy-matchy. I was all ready to design the patterns myself, when I realized that I have no idea how big a toddler actually is. Luckily, Kelly at Sewing in No Man's Land (can I just say that she is one talented lady!) put out a free pattern for a toddler apron earlier this year. This is how that turned out. I couldn't be more in love with how cute it is.


For Shannon (my sister-in-law), I decided I wanted her apron to have some similar features. I wanted the same round pocket and the ruffle at the bottom. However, I decided I wanted her apron to be just from the waist down. I bought the same print in a different color (more oranges, yellows, and greens) and accented it with an orange coordinating fabric. This time, I made the pattern myself (I know about how big an adult is!). And, I am going to share the full tutorial and pattern with you today! Are you as excited as I am?


Shannon's Apron
*all seam allowances are 1/4" unless otherwise noted*

Now, for fair warning before we begin. This is the first pattern I have ever created. I don't have pattern making software; I used a pen, paper, my scanner, and Word. I tried my best to get every line to match up and to get everything the right dimension. If you need to shift a piece of paper to the right or the left a little bit to get all of the edges matched up as you piece together the pattern - then do that! Let me know if there are any major problems, so that way I can adjust them for you and future readers. Just know I tried my best, and I realize I am not perfect :).

You can download the pattern here.


Print your pattern pieces. There are 11 pages, making a total of 5 pattern pieces for this project. Tape together the edges with cooresponding shapes and cut around each of the pieces. On each pattern piece, it says which fabric and how many of that fabric you need to cut out. Make sure your fabric is folded on the Fold lines. If you have a directional print, note the top and bottom of the main apron piece.


1. Cut out a total of 8 pieces of fabric. (unpictured is the white, lining piece)


2. Place your two pocket pieces right-sides together. I put two pins close to each other for my starting and ending point, to make sure I leave a gap in order to turn the piece right-side out.
Sew around the pocket leaving an opening at the top. Clip the corners and the rounded edges (careful not to cut the seams).
Turn your pocket right-side out and press. Sew the opening closed using a small seam allowance (I also topstitched an 1/8" from the top edge of the pocket).


3. Choose where you want your pocket to be on the main apron piece, and pin in place.
Sew an 1/8" from the edge around three sides of the pocket
(leaving the top of the pocket open).


4. Prepare the ruffle. Hem the bottom, left, and right sides of the ruffle under
(I ironed first and then sewed).


5. Prepare the waist band. Iron each short end in about 1/4".
Iron the waist band in half the long way.


6. Place your ruffle (on the bottom) and the waist band (on the top) on the main apron piece.
With right sides together, place the ruffle on top of the main apron piece, lining up the two corners. Pin back the rest of the ruffle so it is not touching the outer edge of the main apron piece (we don't want it to get sewn in!).
Line up the raw edge of the waist band with the top of the apron piece. Center the waist band horizontally (there should be a 1/4" gap between the edge of the waist and the edge of the apron). Pin back the rest of the waist band so it is not touching the outer edge of the main apron piece (we don't want that to get sewn in either!).


7. Lay the main apron piece lining on top of the main apron piece fabric, right sides together. Pin all the way around.


8. Sew around the apron, using a 1/4" seam allowance.
Leave an opening on one of the sides of the apron (enough to turn the apron right side out).


9. Turn the apron right side out and press. Sew the opening shut on the side of the apron. Sew around just the main apron piece (DO NOT sew over top of the waist band) using less than 1/4" seam allowance (I used an 1/8").


10. Prepare the waist ties. With right-sides together, sew each of the waist ties in half down one long side and one short end. Snip the corner and turn each waist tie right side out (you should have two waist ties). Press flat.


11. Insert the raw edge of the waist tie inside of the waist band. Pin in place.
Sew close to the edge (closing the hole and attaching the waist tie) - making sure to backstitch at the beginning and end of your seam. Repeat on the other side.


12. Now you have your completed apron!


I would love to see what your completed apron looks like!
Write a comment linking it to your blog or email me a picture!

Have a great sewing day!


Pin It