Showing posts with label Valentine's Day. Show all posts

Monday, February 20, 2012

Tutorial: Zipper Bracelet


Remember how I have 50 zippers to do projects with this year?


Well, I used two more of them to make a couple of zipper bracelets.
This project is fun, simple, and has so many options to make it uniquely yours!

I had fun picking out the zipper and the button to go with it. I actually used buttons that were my great-grandmother's on these bracelets. I remember walking through her house when I was little and picking out this little container of buttons that I wanted to keep. This is the first time I have ever used any of those buttons. Most of the buttons are just regular, but there are a few that are unique. I used one that was unique with a black zipper and one that was less exciting with a white zipper.

Supplies:
1 zipper
1 button
about 2" of elastic cording (or an elastic hair tie)
Colored thread (either coordinating or contrasting)
Fray Check
Sewing machine/thread/needle, scissors

#1: Open the zipper, and cut off the end that is still connected.
Now you have two zipper pieces.

#2: Pin your two zipper pieces together so the teeth are on the outer edges.
Overlap the fabric portion of the zipper about 1/4".

#3: Sew down the center of your bracelet using your choice of stitch.
Make sure you catch both sides of the zipper as you sew.

#4: Cut the zipper to a comfortable length around your wrist.
(I cut mine to 6-1/4" length, but I have small wrists).
#5: Add a small amount of fray check on each end of the bracelet.

#6: Hand sew the button along one edge.
#7: Sew your elastic cording in a loop along the opposite edge of the bracelet
(with the raw edges of the cording on the back of the bracelet).

#8: Try on your new bracelet!

I also tried out the heart stitch on my sewing machine for fun.

I just think this project is so versatile.
I would love to see the zipper, button, and stitch combination you would choose!

Other projects with zippers:
Pin It

Tuesday, February 14, 2012

Valentine's Date Night


We are not all about extravagant dates around here. We like to keep things simple and just spend time together. I have/will receive two items for Valentine's Day this year.
#1 - a tulip plant (that the hubs received for free from work)
#2 - a pack of skittles (which I am totally excited about!)

I was planning on making something for the Mr. around here, but beings that I only have a few hours left this afternoon and I am not really sure what I should make him - it may not happen. Although I may have just enough time to make him a Yoda bookmark...

In case you are wondering what we have planned for Valentine's Day...I am planning on making these chicken and white bean enchiladas with creamy salsa verde (delicious!)
from skinnytaste.com
and watching Star Wars episode 6: The Return of the Jedi. Yeah, we are super cool over here. We watched episodes 4 and 5 over the weekend, and decided to finish the better trilogy on Valentine's Day. The weird thing - I totally requested to watch Star Wars on Valentine's Day (it was one of those things I felt like I needed to do before having a baby). haha. And we rented it from the library, so this is a totally free date around here (my favorite kind!). I think this is the one with ewoks! For some reason I have always thought they were so cute. Probably because they kind of look like teddy bears.
source
Dessert? Well, I may make a batch of these monster cookie dough cupcakes...or we may just pop some popcorn.
from www.somethingswanky.com
 Oh yeah - this is all happening right after we go to the gym. Something about a normal day is kind of sweet.

What are your Valentine's plans? Anyone else doing some super cheap date? I would love to hear about it!
Pin It

Valentine's Projects 2012

I hope that your day is filled with lots of love today! I have enjoyed putting together some Valentine's projects to share with you, and I hope that you have found one or two things that you are going to try! I know that I have enjoyed looking around at different blogs and seeing all of the creativity. Everything has definitely been pink and red lately!

Here are my Valentine's projects in case you missed any:


What fun project did you complete this Valentine's Day?
Are you ready for projects that aren't all pink and red?

Happy Valentine's Day!
Thanks for stopping by!
Pin It

Wednesday, February 8, 2012

Tutorial: Pattern Paper Heart Garland


I am having fun making some Valentine's decorations on the cheap this year. On Monday, I showed you my Valentine's Day tree branch decor, using simple branches, a vase, and coffee beans. Today, I am going to show you a heart garland made from pattern paper.

This idea formed because it seems that everyone has some sort of project with book pages. When I was at Anthropologie last spring, they were using cut up sewing pattern pieces in the shapes of butterflies to decorate. I decided to try and combine the two ideas and make a garland, with cut-out hearts, using sewing pattern paper.

This is what I came up with:
I am really happy with how it turned out!


I decided to make all of my hearts the same size (varying sizes could look really cool too). So, I made a stencil and accordion-folded my old pattern pieces (I got this pattern in the free bin at my local thrift store). I traced on the hearts.


Then, I cut, cut, cut until I had a huge pile of hearts.


I layered 4 open hearts in my sewing machine and sewed a straight line going down the middle. I left about 3 inches gap between each heart, just by continuing to sew even though I didn't have anything I was feeding into the machine. It helped to hold onto the heart I had just sewn for a few extra inches after it was sewn through, and then feeding the next set of hearts through.
All of my hearts were on one continuous string of thread. If the thread broke, I just went back to the last heart that was connected and continued from there.
I love how some of the hearts have little sewing lines or little scissors! So fun!

After I had a long, long string of hearts, I began to drape them over my Valentine's tree branch decor. You could really string these anywhere!

I hope this inspires you to make some quick Valentine's decor with something you have on hand! What are your favorite Valentine's decorations around your home?

Other Valentine's Day posts:
Pin It

Monday, February 6, 2012

Tutorial: Quick V-Day Tree Branch Decor


So, if you haven't noticed on my blog already, most of my projects use items that I already have around and don't involve purchasing a lot of extra supplies. I also focus a lot of time on sewing/craft projects and baking. However, I do like to mix it up and do a little bit of decor every once in awhile.

You may remember (or may not) my cheap Christmas branch decor project that I posted in December. Using a vase from the same garage sale ($2), some tree branches from the neighborhood, a little gold spray paint, and some coffee beans I made some Valentine's Day decor that is perfect for a mantel (or in my case, a shelf).


This project is pretty simple. I used two types of branches. One type is a dogwood (I believe), where the branches are already red. The other type is just any old regular brown branch. The brown branches were spraypainted gold.


Next, the branches were stuck into a green foam thing inside of the vase. Some branches were trimmed to fit in the vase better.


Finally, coffee beans were pored around and on top of the green foam (making sure to cover it all).


Now you have some fresh smelling, quick Valentine's Day decor to place on your mantel!


Come back on Wednesday, because I am going to be showing you
a fun garland I made for Valentine's Day!


Other Valentine's Day posts:
Pin It

Thursday, February 2, 2012

Tutorial: Fabric Candy Box


I am just a little bit excited about this project! I actually thought of it and made it before Christmas – which totally took me out of the Christmas mood and made me so ready for Valentine’s Day! The fun thing about this candy box is it is made from a red t-shirt (that I had leftover from making this cowgirl shirt), a little bit of batting, and cardboard from a cereal box. So simple! So fun!
To start with, you need to decide how large you want your candy box. I just drew a heart on a piece of paper and made that my stencil. The heart will be the finished size of the box.


From your heart stencil, cut 4 cardboard hearts and 2 batting hearts. Using the spine of your cereal box, cut a few 1” wide strips of cardboard (I ended up only using 2 on my box – but it all depends how big you are going!).


Next, you are going to glue together some cardboard and batting sandwiches (I used hot glue). Think of the cardboard as the bread and the batting as the peanut butter (or whatever your sandwich of choice is). You are going to make two sandwiches.


Using your heart sandwich as a stencil, cut the red knit fabric. I prefer a seam allowance of ¼”, so I cut my red fabric ¼” wider along all sides of the heart sandwich. Cut 4 red hearts.


With right-sides together, sew 2 red hearts together all the way around (leaving no gaps). Repeat with your second set of red hearts.


Next, clip the curves and points around your heart. Carefully cut a slit in one of your hearts (careful – don’t go through both layers!). Make sure that your slit stays in the center of the heart (stay at least 1” away from all edges). Repeat with your second set of red hearts.


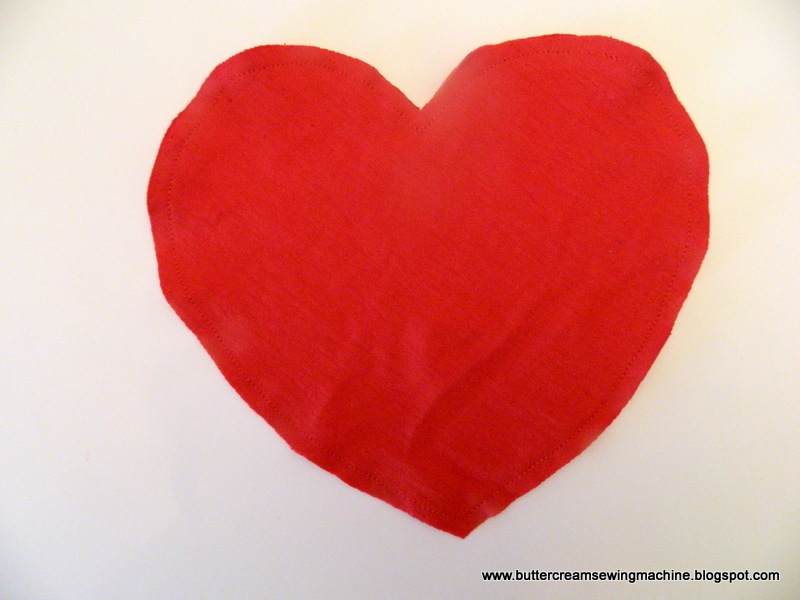
Turn your heart right-side-out through the slit you cut. Repeat with your second set of red hearts.


Carefully stuff your heart cardboard sandwich inside of the red heart layers. I ended up cutting my slit wider; cutting a horizontal slit worked a lot better than a vertical slit in order to get the heart sandwich inside. It will look messy on one side, but we will cover that up.


When you turn your heart over, it will look like this!


Repeat with your second set of red hearts. (You can see for the top of the box, I decided to add some little white hearts. Totally optional – you can leave it plain or dress it up as much as you want!)


Next, we are going to cut 2 more red hearts to cover up those ugly/messy slits we made on the inside of the hearts. I made my red hearts 1” smaller on all sides than the finished heart size.


Glue these on the inside of your box (making sure to center them) with your hot glue gun by putting a thin bead of glue close to the edge of the smaller heart. I embellished mine with some white thread and the word ‘love’ (that will show once all of the candy is eaten out of the boxJ). It may help to glue the ugly/messy slit down flat before you glue these hearts on top.


Next, we are going to make a sleeve for the rim of the box. My rim has a width of 1”, so I cut a strip of red fabric 2.5” (for a ¼” seam allowance), making sure to have a length longer than the distance around the smaller heart. With right-sides together, sew a ¼” seam allowance along the length of the strip. Tape together two pieces of cardboard that you cut earlier, end-to-end.


Turn right-side-out, and slide over the cardboard strips. I measured around the smaller heart that is glued inside of the box, and cut my cardboard to exactly that length. I trimmed the excess red fabric (leaving about ½”-1” extra). I then taped together the two ends of the cardboard (end-to-end), so it made one long loop.


Slide your fabric all the way around the loop, making sure it is nice and even. Overlap the excess fabric. Tuck under raw edges, and glue the edge in place.


Using a small bead of hot glue, glue one edge of the fabric-covered cardboard strip to the base of the box. I made sure that I got nice and close to the inside heart, but I didn’t glue on top of it. I also used the hinge of where two cardboard strips came together as the bottom corner of the box (that made gluing it down much easier). Double check that it is glued down all the way around (I missed a couple of little spots the first time I did this).


Finally, place the lid of your candy box on top of the base. The heart that is glued under the lid makes sure that the lid didn’t slide around (it fits perfectly inside of the rim that is glued on the base of the box).
Fill with candy and special treats, and give it away to someone you love!


I would love to see some pictures of how you made your box unique! And for ideas to fill up the box - try Raspberry Ribbons (a delicious butter cookie)...more recipes to come this week!
Pin It