Wednesday, March 7, 2012

Tutorial: Zippered Anything Pouch

If you haven't noticed, some of my favorite things to sew are clutches and purses. I love that you can use fun fabrics and make a useful item. I also love that you don't have to know someones size in order to give a personalized gift!


A friend of mine showed me a pouch similar to this one that she had bought for around $15 dollars. She said she would love to have more of the same pouch and wanted to sew them herself. I took some measurements of the pouch she had, and based the project off of that (I condensed the size just a little bit so I could use two fat quarters of fabric). The fun part is, you can use the general steps for this pouch and make it whatever size you want to! If you need something to hold a few toiletry items for traveling, measure the length of your toothbrush and make sure it will fit.

It is a perfect pouch for keeping toys together...

...for art supplies to keep little (or big) hands busy...

...or to keep your newest craft project all together and clean for mobility!

I hope you have as much fun making your zippered pouch as I did.

Supplies:


  • Two Fat Quarters (one for the outer fabric and one for the lining)

  • Two - 11" x 10.5" pieces of fusible fleece or batting
  • One - 10" zipper (use this tutorial to help you get the right length of zipper)
  • Basic sewing supplies (thread, sewing machine, scissors, etc.)

Directions:

#1 - Cut each fat quarter into two 11" x 10.5" rectangles.
*If you are using fusbile fleece, press it to the back of your outer fabric or your lining fabric now.

#2 - Layer your outer fabric and lining fabric right sides together. Center the zipper between these two layers along the top edge, facing the outer fabric (it should be about 1/4" from each edge). If using batting - place the batting on top of all of the layers. Sew across the top edge.

#3 - Layer your other piece of outer fabric and lining fabric with right sides together. Center the raw edge of the zipper between these two layers along the top edge, facing the other outer fabric (it should be about 1/4" from the left and right edge). If using batting - place the batting on top of all of the layers. Sew across the top edge (sewing through 4 layers - including the batting/fusbile fleece).

#4 - Lay your fabrics out so the zipper is in the center. On the left side of the zipper should be one piece of lining fabric, one piece of the batting, and one piece of the outer fabric. The same three layers should be on the right side of the zipper. Sew next to each side of the zipper.

#5 - Open your zipper about halfway. Lay your pouch so the outer fabric is facing right sides together on one side of the zipper, and your lining fabric is facing right sides together on the other side of the zipper. The batting can be placed either with the lining or with the outer fabric (I placed it with the lining). Sew around the pouch, leaving a 2"-3" opening along one side of the lining. Be careful not to sew the edges of your zipper as you sew around the pouch.

#6 - Optional: Make box corners. There are several ways to do this (so do what is comfortable for you). I lay my corner flat, so the seam is running down the middle. Line up your ruler so the center seam line and the edge of the fabric is at a 45 degree angle. I measured 2.5" across and drew a line.

#7 - Sew along this line, and cut off the corner about 1/4" from the seam line. Repeat with the other bottom corner on the outer fabric, as well as the two bottom corners on the lining fabric. This will give your pouch a flat bottom.

#8 - Turn the pouch right side out.

#9 - Sew the opening in the lining closed by handstitching or using a small seam allowance.

#10 - Enjoy your Zippered Anything Pouch!

What are you going to put inside?

Other fun clutches and purses you can sew:
Fabric Strip Clutch
Red Wool Purse


Pin It

Monday, March 5, 2012

Winner's Bouquet Quilt

For the last couple of years, I have received the best birthday present from my parents. I get to pick out the pattern and fabric to make a quilt! The rules are simple: I must finish the top of my birthday quilt from last year in order to get more fabric for my birthday this year. It keeps me focused on a project for a period of time - especially when there are so many projects that I can't wait to get my hands on!

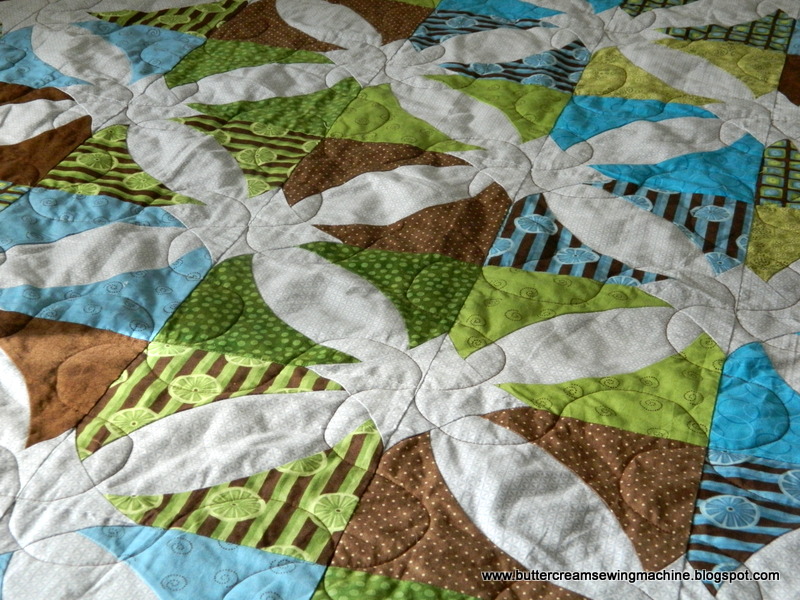
This pattern is called Winner's Bouquet, and it is by Atkinson Design. It costs about $30 for the pattern because it includes the plastic template pieces. I also purchased a 45mm rotary cutter to use with the templates.

I have been trying to break my habit of always being drawn to the same style of fabrics (usually batiks), and I have been expanding into more novelty prints. I chose all blues, greens, and browns for this quilt. When unfolded on my bed, it kind of makes me eyes pop out because I feel like it is really bright. So, often times, I have it folded as a bed runner at the end of my bed. I am trying really hard to expand my color palette though!

This quilt is king size! I literally poked myself in the neck with pins as I was feeding this thing through my sewing machine. It is a beast!

It is also one of my first attempts sewing curved seams. The blocks themselves were pretty easy to assemble, as there is only five pieces of fabric within each block. They did require pinning in order to make sure all of the seams lined up correctly.

I like the look of having the light blue run throughout the quilt and in the inner border. I feel as though it almost makes it look like a window.

I think what makes this quilt is the stitching that I did on top. My grandma has a long-arm sewing machine, so we always have fun picking out how we want to sew our newest quilt. I feel like 90% of our quilts end up being a stipple stitch, but I knew on this quilt I wanted to do something that shows off each block. We chose to do a puzzle piece design. I think it just completes the quilt!

We measured the length of each block and divided it by two. We cut a half circle with a diameter that was half the length of the block. I traced across a row on the quilt, placing the template on one side of the block seam and then flipping it upside down and placing it on the other side of the block seam. I would then sew across an entire row on the quilt (12 blocks wide), sewing the curves like a wave from one end of the quilt to the other.

Once I completed all of the wavy lines going across the width of the quilt, we took it out of the long-arm machine. We put it back in the machine so now I could go across the quilt with wavy lines the long way (also 12 blocks long).

When completed all of the wavy lines met together at the corners of each block.

For the inner boarder, I did a thin wavy line (not my favorite thing about the quilt).

For the outer boarder, I used the template again, and sewed a wavy line that matches the rest of the quilt.

I feel as though these stitches really finished off the quilt beautifully!
Unfortunately, on the next quilt that I quilted, I went back to a stipple stitch...but I do feel a little bit braver after completing this quilt!
Pin It

Wednesday, February 29, 2012

Bopple Ball

Two of my good friends from college had a little girl...last August. We usually see each other every couple of months, but I have continued to forget to give a baby gift. Have you ever had that happen? The good thing is that I can still give a gift to her when she is a baby (6 months later isn't too late...right?) - so there are so many fun projects to choose from. I love making gifts for people because it allows me to be creative for a purpose. I can enjoy the process of making and enjoy the giving of a gift. And then, there are always the fun little project leftovers that you can use for something else (the pattern, scraps, etc.) - just an added bonus!

My grandma bought this Bopple Ball pattern last summer on our annual quilting trip (8 quilt stores in two days - yes!). The other ladies who were riding in the bus with us were jealous of her find, as it was the last of this pattern in the shop. My grandma recently made a bopple ball for my sister's little one (remember - I made those cute little baby shoes!). She actually didn't have that much fun making the pattern, but she is primarily a quilter and this pattern has lots of little shapes to cut, sew, turn, and stuff. I, on the other hand, had a lot of fun putting together this project! I enjoy tedious little projects, and the result was so cute!

I chose to use two coordinating fabrics for my bopple ball (pink and dark brown).

The arms are pink on one side and brown on the other. I lined up the arms so the pink side of the arm would be touching a brown wedge and vice-versa.

There are 14 little arms and 8 wedges going around the bopple ball.
The diameter of the ball is about 8".

Two things make this pattern a little bit difficult:
#1 - The pattern pieces are confusing. The wedge pattern piece says to cut 8 and includes the seam allowance; however, the little arms say to cut 14 (but you really need to cut 28 pieces - one for each side of the arms) and you have to add in a 1/4" seam allowance around the piece. So, once I figured that out it was a lot easier - but it wasn't super user friendly from the start.
#2 - Turning the bopple ball right side out with all of those little arms. If you have patience or need patience, this project is for you!

Other notes: There is a circle of fabric that you can place on each end of the bopple ball to cover up where the seams all meet, but I omitted that. I used two 1/4 yard cuts (not fat quarters) in order to make the bopple ball - a little less fabric than what they asked for. But, I had almost no fabric leftover. I also only used about 16 oz. of stuffing instead of the 24 oz. they asked for - I stuffed it very firm too!

I would definitely make this pattern again. It was fun, and it is so cute! It will be fun for that little girl now, and it will still be fun to toss around when she is 3. Those are the best toys!


Last time I posted a baby gift, I asked about what kinds of baby gifts you like to give. I got some great ideas - including swaddle blankets, tag blankets, and crocheting beanies. Let's keep adding to the list! What else do you like to give to a new baby?

Other baby gift ideas:
Baby Kawaii Kimono Shoes
Baby Log Cabin Tag Quilt
Pin It