Showing posts with label quilt. Show all posts

Monday, March 12, 2012

Block of the Month 2011

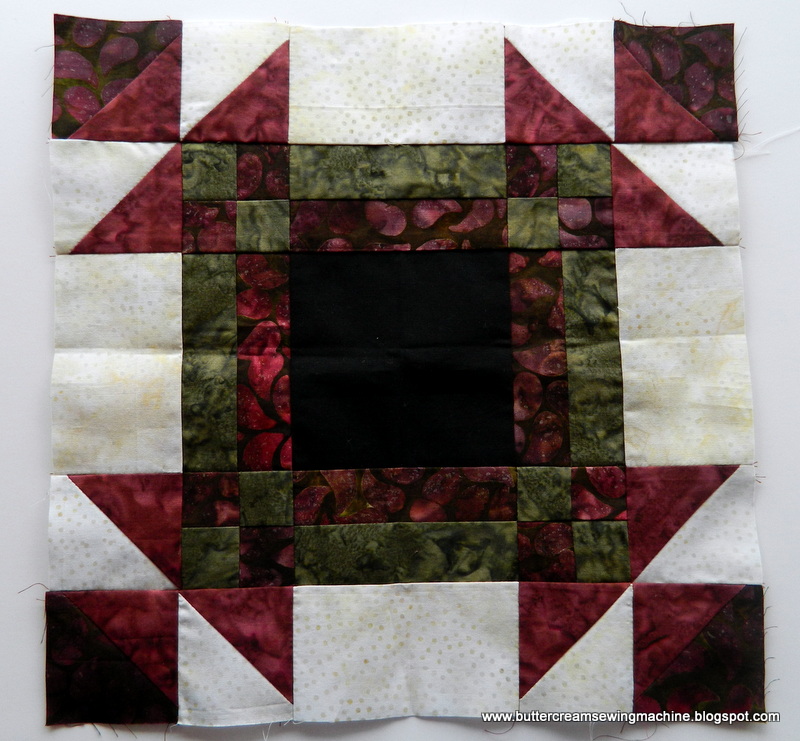
I decided to spend a little bit of my Christmas money from 2010 in order to participate in the block of the month club at my local quilt store in 2011. For $20, I bought the pattern and the first block. As long as I came to one of the 'classes' (a.k.a. "we are going to try and sell you all of the new patterns and fabrics we got at the store in the last month") and had my block completed from the previous month, I received the next month's block free. I could choose between Civil War, Kansas Troubles, or batik fabrics.


I chose batik fabrics.

Each block involved different colors of batik fabrics, but the center of all of the blocks was a solid black square. I stretched myself and learned new techniques to make blocks I had never made before. I definitely learned a lot last year!

January

February

March

April

May

June

July

August

September

October

November

December

After I finished the last block, I worked on piecing together the quilt. I chose to use black and white for sashing and star points between the blocks. I was hoping to blend in the black centers of each block.


When quilted, it will be a lap-sized quilt for our living room.


I don't love all of the black, and I am sad that it looks like the sampler it is (although I don't know what I expected). I am planning on backing it in a minky fabric, so I know it will get lots of use.

I chose not to do the block of the month for 2012, because after paying the initial fee, for the finishing fabrics, and for the gas each month, I realized I could make a quilt that I really want to make. I have thought about building my stash of fabrics this year and making blocks from The Farmer's Wife. But, I haven't decided for sure yet.

Have you ever participated in a block of the month before? What did you think? Would you do it again?


Pin It

Monday, March 5, 2012

Winner's Bouquet Quilt

For the last couple of years, I have received the best birthday present from my parents. I get to pick out the pattern and fabric to make a quilt! The rules are simple: I must finish the top of my birthday quilt from last year in order to get more fabric for my birthday this year. It keeps me focused on a project for a period of time - especially when there are so many projects that I can't wait to get my hands on!

This pattern is called Winner's Bouquet, and it is by Atkinson Design. It costs about $30 for the pattern because it includes the plastic template pieces. I also purchased a 45mm rotary cutter to use with the templates.

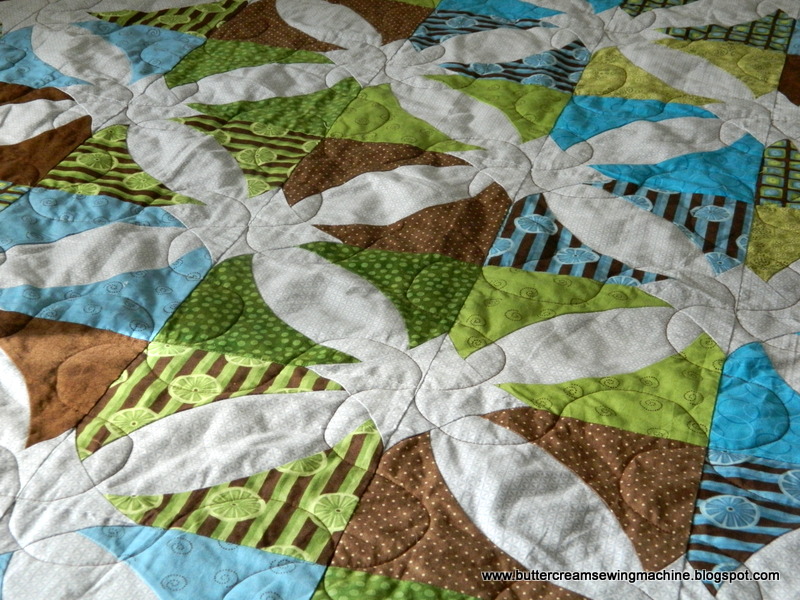
I have been trying to break my habit of always being drawn to the same style of fabrics (usually batiks), and I have been expanding into more novelty prints. I chose all blues, greens, and browns for this quilt. When unfolded on my bed, it kind of makes me eyes pop out because I feel like it is really bright. So, often times, I have it folded as a bed runner at the end of my bed. I am trying really hard to expand my color palette though!

This quilt is king size! I literally poked myself in the neck with pins as I was feeding this thing through my sewing machine. It is a beast!

It is also one of my first attempts sewing curved seams. The blocks themselves were pretty easy to assemble, as there is only five pieces of fabric within each block. They did require pinning in order to make sure all of the seams lined up correctly.

I like the look of having the light blue run throughout the quilt and in the inner border. I feel as though it almost makes it look like a window.

I think what makes this quilt is the stitching that I did on top. My grandma has a long-arm sewing machine, so we always have fun picking out how we want to sew our newest quilt. I feel like 90% of our quilts end up being a stipple stitch, but I knew on this quilt I wanted to do something that shows off each block. We chose to do a puzzle piece design. I think it just completes the quilt!

We measured the length of each block and divided it by two. We cut a half circle with a diameter that was half the length of the block. I traced across a row on the quilt, placing the template on one side of the block seam and then flipping it upside down and placing it on the other side of the block seam. I would then sew across an entire row on the quilt (12 blocks wide), sewing the curves like a wave from one end of the quilt to the other.

Once I completed all of the wavy lines going across the width of the quilt, we took it out of the long-arm machine. We put it back in the machine so now I could go across the quilt with wavy lines the long way (also 12 blocks long).

When completed all of the wavy lines met together at the corners of each block.

For the inner boarder, I did a thin wavy line (not my favorite thing about the quilt).

For the outer boarder, I used the template again, and sewed a wavy line that matches the rest of the quilt.

I feel as though these stitches really finished off the quilt beautifully!
Unfortunately, on the next quilt that I quilted, I went back to a stipple stitch...but I do feel a little bit braver after completing this quilt!
Pin It

Monday, January 23, 2012

Tutorial: Baby Log Cabin Tag Quilt


Do you ever need to get a gift together for a baby, and you don't have a lot of time? This baby blanket is made for that. Either you are an experienced sewist and everyone knows it so you can't show up with a store-bought gift...or you are new at sewing and you need something to give that is simple, but sure to wow. Either way - this baby quilt is perfect for that!

I originally came up with this pattern a couple of years ago, and since then I have made many versions of this blanket in all different colors. Here are three examples that I have photos of:


People love it when there baby has the little 'tags' (or in this case, ribbons) to grab and chew. However, most of the tag blankets that I have seen are little 12" squares. This size can be very useful, however I wanted to make a larger version of a tag blanket with a quilt look that can be a gift all by itself. Hence, the Baby Log Cabin Tag Quilt was born (hehe). Two layers of cute flannel + a layer of lightweight batting + many little ribbons to grab all pieced together in a baby-sized quilt = cuteness. The finished size of this quilt is about 26" x 36".

You will need 3 different flannel prints. You can buy 1/2 yard of each and barely have enough to piece together the front and the back, but you may end up hating yourself by the end of the quilt (especially when the back takes about 3 times as long to put together as the front and you literally end up with scraps of fabric that are too small to put in your scrap bin - not that I have done that or anything...). So, I would recommend maybe getting 2/3 of a yard, or maybe even 3/4 of a yard of 3 different fabrics. You may still have to piece together the back a little bit, but it won't be too bad. Or make it easy on yourself, buy enough of one of the fabrics that you can finish the whole back in it. You will also need one piece of lightweight batting that is large enough to cover 26" x 36". And, you will need about 24 pieces of ribbon, each cut to 3" long (I used 25 pieces on this quilt). Here is the breakdown:

I am using 3 flannel fabrics.


From the star fabric, cut:
one - 12-1/2" square
one - 4-1/2" x 17-1/2"
one - 4-1/2" x 21-1/2"


From the blue fabric cut:
one - 2-1/2" x 12-1/2"
one - 2-1/2" x 14-1/2"
one - 5-1/2" x 21-1/2"
one - 5-1/2" x 26-1/2"


From the chocolate fabric, cut:
one - 3-1/2" x 14-1/2"
one - 3-1/2" x 17-1/2"
two - 5-1/2" x 26-1/2"


Here is a diagram of how all of the fabric pieces go together:

This diagram shows the order that each piece is added (in ABC order) as well as where each size/color of fabric is located. It may be helpful to lay all of your pieces out in this diagram before you begin to sew.

Pieces are added along one edge of the main piece. Place the pieces right-sides together. Press the seam open before adding the next piece. Pieces are added in a spiral rotation around the center block (on top, the right, the bottom, the left, repeat). The same color fabric should only meet in an 'L' shape (the long sides of the rectangle should not be sewn to a fabric of the same color). All seam allowances are 1/4" unless otherwise noted.

1. Start with your 12-1/2" square from the star fabric. Add your 2-1/2" x 12-1/2" blue fabric on top of the square.
2. Press open.
3. Add your 2-1/2" x 14-1/2" on the rightside of the main piece.
4. Press open.


5. Add your 3-1/2" x 14-1/2" chocolate fabric on the bottom of the main piece.
6. Add your 3-1/2" x 17-1/2" chocolate fabric on the left side of the main piece.
7. Add your 4-1/2" x 17-1/2" star fabric on the top side of the main piece.
8. Add your 4-1/2" x 21-1/2" star fabric on the right side of the main piece.

9. Add your 5-1/2" x 21-1/2" blue fabric on the bottom of the main piece.
10. Add your 5-1/2" x 26-1/2" blue fabric on the left side of the main piece.
11. Add one 5-1/2" x 26-1/2" chocolate piece on the top of the main piece and one 5-1/2" x 26-1/2" chocolate piece on the bottom of the main piece.

Now you have the top of your Baby Log Cabin Tag Quilt completed.

Let's attach the ribbon. I have 25 pieces of ribbon, each 3" long, in assorted colors and textures that coordinate with my fabrics.

Choose the location of each ribbon along the outer edge of the quilt, matching up raw edges. Fold the ribbon over, so both raw edges of the ribbon are now lined up with the quilt edge.
Pin in place.

Repeat for all of the ribbons around the whole quilt.

Sew each ribbon onto to the top of the quilt with a small seam allowance (I used 1/8").
Forward and backstitch over each ribbon so that they are very secure.

Layer your batting, quilt backing, and quilt top together (in that order). The quilt backing and the quilt top should be facing right-sides together. All the ribbon loops should be between these layers (not sticking out). Pin around the edge of the quilt. Sew around the edge of the quilt leaving a few inches open on one side (it is best to leave the opening between ribbons).

Clip the four corners of the quilt. Turn right-side out.

Press the quilt, and pin the opening closed.
Sew the opening closed with a small seam allowance.

Top stitch around the entire quilt using a 1/4" seam allowance.

Quilt on top of the quilt. I used my stitch regulator (dropping the feed dogs) and did a combination of loops and little stars for my design.
You could also do straight or diagonal lines if you don't have a stitch regulator.

And, you have your finished Baby Log Cabin Quilt!

Happy Sewing!
Another project for baby:
Pin It

Wednesday, December 14, 2011

Raccoon Mini-Wall Hanging

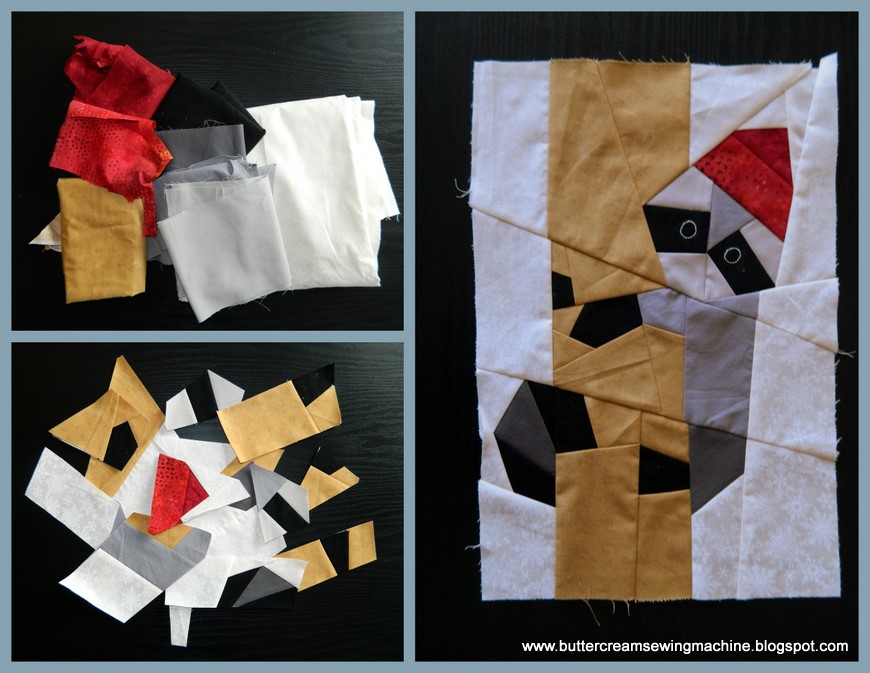
It is so exciting to me that a pile of fabric...
can turn into little odd-shaped pieces...
that can turn into a raccoon climbing a tree!

My uncle always wanted a pet raccoon when he was a kid, so when I saw the paper-pieced pattern to make this cute raccoon - I knew I had to make it for him! Only the raccoon portion is in this issue, with the rest of the animals in the next. That's ok though, I really wanted to just make the raccoon anyway.
Thanks, Grandma, for subscribing me to Quiltmaker!

 This is how it all turned out! I am so happy with the results! I had fun with the stitching. The brown-ish fabric is plain; I added the dark brown stitches on top to look like tree bark. I also did a stipple stitch on the white to make it look like snow/wind.

I also made little pom-poms for the nose and hat using fabric circles and a little bit of stuffing. The eyes were hand-stitched with white embroidery floss.

Here is the back.
I made three loops of fabric across the back, and sewed it on when I machine-stitched the binding on the front. I then added a thin dowel to be hung by. If I could change one thing, I would have used white thread in my bobbin, so that way the tree bark stitching wouldn't be so dark on the back (I used dark brown thread).

Another fun thing about this project - the total cost was $2.67 in order to buy two shades of gray and the dowel. Everything else I had in my fabric stash (or in my mom's stash). 

You want to know something? This is the second time I have made a paper-piecing project. I am really proud of the results. I taught myself by reading a book I checked out from the library. Here is my first project:
I just made one block from the book using scrap fabrics. It is suppose to be a rose. From rose to raccoon - not bad!

Happy Sewing!
Linking up to: I Heart Naptime, Tip Junkie
Pin It